
If you are someone who is looking to expand their business on Amazon and is in the initial stages of becoming an Amazon seller, then this blog will guide you through the entire process in detail.
Note: Please ensure you have PAN, GST, and Bank account details handy to save yourself from the hassle
Let’s get started –
Step 1: Visit Amazon Seller Central
Step 2: Click on the Start Selling button
Step 3: In case you’re having a buyer account you can simply login using the same credentials.
Step 4: If you’re not having an account, then click on Create your Amazon account
Step 5: Enter the required details like name, mobile number, email-id password, and then click on Continue
Step 6: Enter the OTP and click on Create your Amazon account. Now your account has been created for the same email-id/mobile number and password
Step 7: Now login using the same credentials
Step 8: Till now your seller account has been created. Now you need to enter your company’s details
Note: Keep the following things ready and try to enter these details in 1 day:
a) Your Bank account details for receiving money from Amazon
b) GST & PAN details (for tax purpose)
c) On the next screen you are required to enter your Business/Company name (Name registered under/with GST)
Step 9: Go through the seller agreement and after the agreement is accepted click on continue
Step 10: Now you’ve entered the Seller Information tab.
Enter Store Name (Unique & different store name which is not being used by other than sellers)
Select a product category for your products. Choose one category for now later on you can add more categories in which you want to sell your products.
Enter address details from where you’ll be shipping your products to the consumers. Click on continue
Step 11: Now choose your shipping method among Fulfilment by Amazon (FBA), EasyShip, Self-ship.

Table of Contents
Fulfilment by Amazon (FBA)
Where you use Amazon’s warehouse facility and Amazon charges commission on behalf of the facility provided. Amazon The major advantage of FBA is you get a Prime tag for your products
Benefits of using FBA Model
- It allows firms to devote more time to their core operations. The process of shipping, delivery, and refunds can take up a lot of a manager’s work. Because FBA takes care of this problem, a company can focus on strategic changes and improving their product.
- The fulfilment centre can help your firm grow quickly because it can store a large selection of products and fulfil orders swiftly.
Amazon Easy Ship
Here you store the inventory in your own storage facility, packaging also needs to be handled by you (Seller) while Amazon takes care of picking and delivering the packed orders.
Benefits of using Easy Ship Model
- Convenient order scheduling: Schedule orders for pick-up at a time that is convenient for you throughout the day.
- Orders can be tracked in real time until the product is delivered to the customer.
- It currently serves 99.4 percent of India’s delivery pin codes, giving your company the broadest possible reach.
- Cash on Delivery payments: Because Cash on Delivery is widely utilised in India, you can use Easy ship services to fulfil your purchases utilizing Cash on Delivery.
Self-Ship
You solely manage the inventory, packaging, and shipping for your orders. Prime tag and Cash on delivery options aren’t available under this option.
(See the comparison chart below)

After choosing your shipping method click on Next.
Step 12: Now on the Tax details tab: Enter your Tax Details including Seller Legal Name, GST, and PAN (in case you’re a proprietor enter your PAN, and if its company incorporated then add the company’s PAN details)
or In case your product falls into GST exempted category select the “I sell in GST exempted category”
Note: Try to enter the above 3 details on the same day to avoid any kind of temporary suspension/blocking for your seller account
Step 13: On the next screen:
a) Under the Products to sell option you can add/remove categories in which you wish to sell your products and list your products as well. We recommend listing your product after your account has been created.
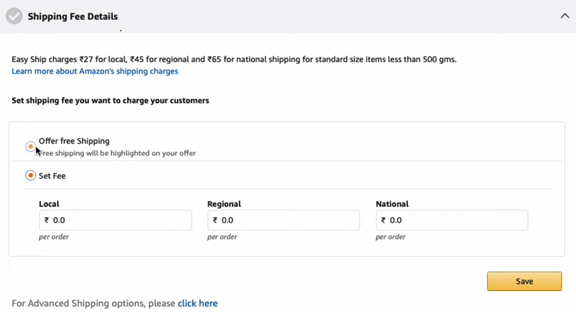
b) Next is the shipping fee details option where you can choose from the available options as per your selected shipping model (FBA, EasyShip, Self-Ship) and click on save.
c) Now enter your Bank account details with the account holder’s name, bank account number, type of bank account, and IFSC code and click on save
d) Next on Tax details enter the Seller Legal Name, GST Number, and PAN number and click on save
e) On the next table i.e. “Default product tax code” you need to enter the tax slab applicable for your product category and after agreeing to Amazon’s Tax calculation methodology click on save.
f) Next is the signature step where either you can draw your signature, or you can upload your signature which will be used on the invoices sent to customers
Step 14: After entering all the above details click on Launch your business
Note: After your Amazon Seller account has been created, list your products via Add Product/Add products via the upload option available under the Manage Inventory option.
Paxcom’s best practices
Paxcom has been helping brands list their products on various eCommerce channels. It offers an end-to-end solution, from creating content to running advertisements on eCommerce platforms–all intending to maximize revenue. We tailor the solution to meet your specific needs by utilizing the expertise of our team, as well as existing resources and technology.

Here are some additional services you can expect from our eCommerce experts
- Adding/relisting new/old products, creating product variations, creating high-resolution lifestyle images, revising product titles, bullet points, descriptions, A+ content, creating brand stores for increased purchase rates.
- Planning and monitoring inventory through the use of a custom-built in-house tool, Kinator.
- Designing and executing pay-per-click advertising campaigns, managing budgets, analysis, and recommendations.
- Managing promotions – Deals, coupons, combos for higher sales traction.
- Implementing display and banner advertisements on different channels and updating brand stores for greater visibility.
- Offering data analysis services with key insights on the major KPIs (content scorecard, reviews, and ratings, organic visibility) to help brands make sound and data-driven decisions.